Creating an Apache Spark application with python is very easy. You just add spark python api code and submit the application using spark-submit. For scala however, things can be a bit involved because of maven and the way dependencies are managed and Spark code is added. When I was starting out with Spark in Scala, I did not find any guide about how Spark can be used with Scala in an IDE, for example, Scala IDE (which is based on Eclipse IDE). So I wrote this guide as a reference for myself and as something I can share with coworkers and friends, should they ever need it.
What we are going to do:
- Create a bare bones scala project and make sure it successfully builds
- Import project in Eclipse and make sure it builds successfully
- Add some Spark to it (pun intended)
- Make sure it builds successfully, again
#1 Create a bare bones Scala project
I assume that Apache Spark is installed and is in path. Also, make sure to have maven installed and in PATH then do the following:
- Run
mvn archetype:generateand wait till the message[INFO] Generating project in Interactive modeappears. - After the message, wait for Maven to download dependencies. Once it’s done, it will ask you to apply a filter:
Choose a number or apply filter (format: [groupId:]artifactId ... - Enter
scala-archetype-simpleand press enter. - From the next list choose
1: remote -> net.alchim31.maven:scala-archetype-simpleby entering 1. - Then it will present a list of version, select the latest (in this case enter 3, for version 1.6).
- Then it will download some dependencies, after which it will ask for groupId, artifactId etc. which you can fill to your liking.
Example interaction is given below:
(Point # 1)
(Point # 2 and onwards)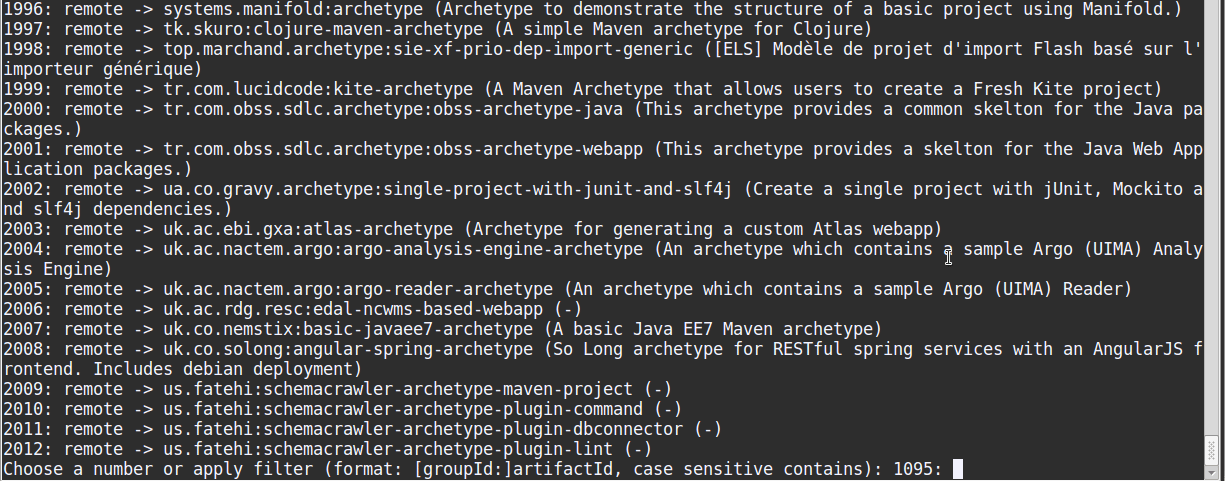
As shown, you should get a BUILD SUCCESS at the end. You will now have a folder mysparkscala in the directory. This completes step 1.
#2 Import project in IDE
To open this folder as a project in Eclipse/Scala IDE do the following.
- Open Eclipse/Scala IDE
- Go to File -> Import -> Maven -> Existing Maven Projects.
- Press browse and go to the directory containing
mysparkscala, and select it. The project list below will be populated. Press Finish to import this project.
Your project will now appear in project explorer. To be able to run this project from IDE, we need to add Run Configurations. See the following GIF to see how it can be done.
Click Apply, then click Run. This will trigger the build process.
If you get error like this…
[ERROR] scalac error: bad option: '-make:transitive'
[INFO] scalac -help  gives more information
[INFO] ------------------------------------------------------------------------
[INFO] BUILD FAILURE
[INFO] ------------------------------------------------------------------------
[INFO] Total time: 1.279 s
[INFO] Finished at: 2017-10-18T13:50:53+05:00
[INFO] Final Memory: 12M/212M
[INFO] ------------------------------------------------------------------------
[ERROR] Failed to execute goal net.alchim31.maven:scala-maven-plugin:3.2.0:compile (default) on project mysparkscala: wrap: org.apache.commons.exec.ExecuteException: Process exited with an error: 1 (Exit value: 1) -> [Help 1]
…go to your pom.xml and comment the line -make:transitive (line 70 in my case) and save the file.
Now click the green play button in top bar (the same we used to add run config.) and select your Build name (e.g SparkScalaBuild)
Project should build fine now, and you should get.
[INFO] Building jar: /home/yaseen/yaseen/mysparkscala/target/mysparkscala-1.0-SNAPSHOT.jar
[INFO] ------------------------------------------------------------------------
[INFO] BUILD SUCCESS
[INFO] ------------------------------------------------------------------------
[INFO] Total time: 3.154 s
[INFO] Finished at: 2017-10-18T13:52:30+05:00
[INFO] Final Memory: 14M/212M
[INFO] ------------------------------------------------------------------------
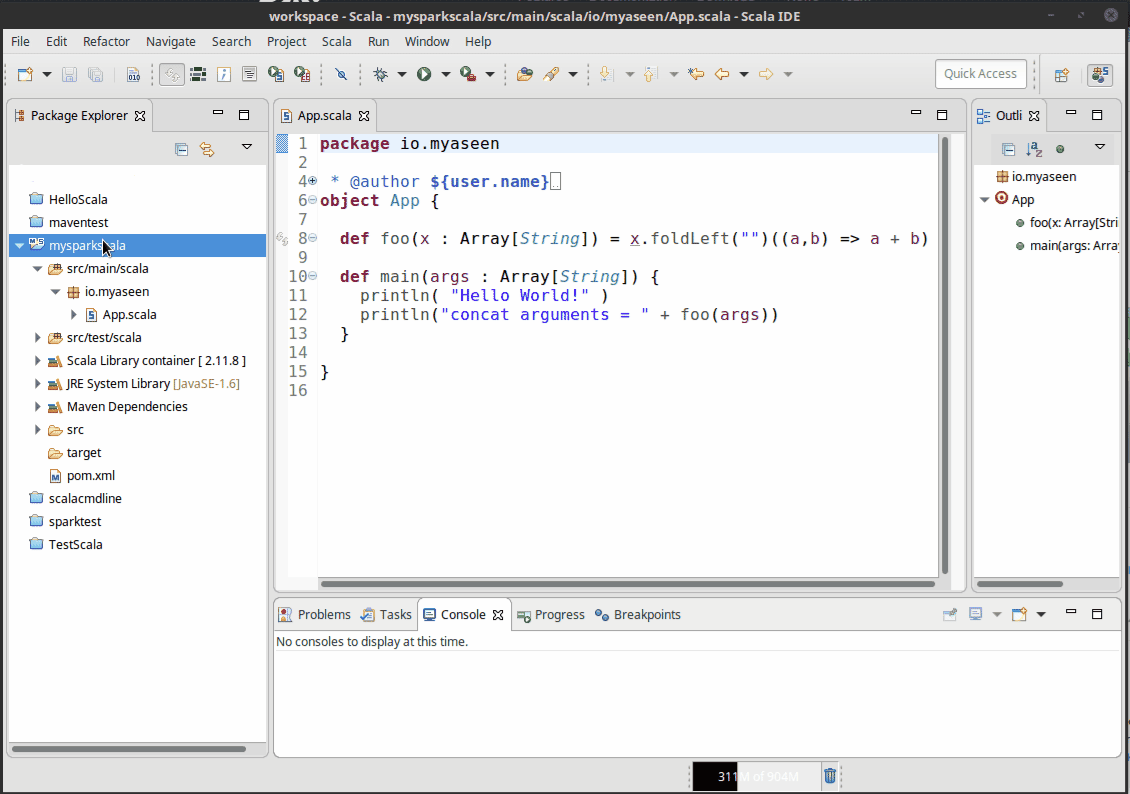
Open App.scala and press the little black arrow button next to green play button and select Run As -> Scala Application. You should see output in Eclipse console. This completes the step 2.
#3 Add Spark dependencies and code
Now to add Spark/Hadoop/Hive related code we need to add the relevant dependencies. To do this, add the following in dependencies section of your pom.xml file.
[code lang=”xml”]
<!– for apache spark –>
<dependency>
<groupId>org.apache.spark</groupId>
<artifactId>spark-core_2.11</artifactId>
<version>2.2.0</version>
</dependency>
<!– https://mvnrepository.com/artifact/org.apache.spark/spark-sql_2.11 –><span data-mce-type="bookmark" id="mce_SELREST_start" data-mce-style="overflow:hidden;line-height:0" style="overflow:hidden;line-height:0" ></span>
<!– for info about "provided" dependencies: https://stackoverflow.com/questions/6646959/difference-between-maven-scope-compile-and-provided-for-jar-packaging –>
<dependency>
<groupId>org.apache.spark</groupId>
<artifactId>spark-sql_2.11</artifactId>
<version>2.2.0</version>
<scope>provided</scope>
</dependency>
<dependency>
<groupId>org.apache.hadoop</groupId>
<artifactId>hadoop-client</artifactId>
<version>2.7.3</version>
</dependency>
<!– https://mvnrepository.com/artifact/org.apache.spark/spark-mllib_2.11 –>
<dependency>
<groupId>org.apache.spark</groupId>
<artifactId>spark-mllib_2.11</artifactId>
<version>2.2.0</version>
<scope>provided</scope>
</dependency>
<!– https://mvnrepository.com/artifact/org.apache.spark/spark-hive_2.11 –>
<dependency>
<groupId>org.apache.spark</groupId>
<artifactId>spark-hive_2.11</artifactId>
<version>2.2.0</version>
<scope>provided</scope>
</dependency>
[/code]
Change your App.scala code to this:
[code lang=”scala”]
package io.myaseen
import org.apache.spark.sql.SparkSession;
object App {
def main(args : Array[String]) {
println( "Hello World!" )
val spark = SparkSession
.builder()
.appName("AppName")
.enableHiveSupport()
.getOrCreate()
}
}
[/code]
To run this, go to green play button and select sparkscalabuild. While building it will download all the dependencies we specified. Once build succeeds, you can run your jar file using either local or yarn master.
For running on YARN cluster run:
spark-submit \
 --class io.myaseen.mysparkscala.App \
 --master yarn \
 --deploy-mode cluster \
 mysparkscala-1.0-SNAPSHOT.jar
This will submit your Spark application written in scala to YARN cluster for execution.
Be First to Comment